Inlay joinery has been a part of woodworking for centuries, whether to prevent further splitting in a board or to add a decorative touch. Slab Stitcher takes this age-old technique and makes it quick and easy for a woodworker of any skillset and with minimal tools, making inlay joinery widely available and ensuring that anyone can have a flawless fit. Whether you consider yourself a woodworking hobbyist or a full-time furniture maker, the results from the Slab Stitcher system are unbeatable. Here are some helpful tips for new users to get the most out of their kits and get that sawdust flyin' ASAP.
Slab Stitcher Kit Step-by-Step
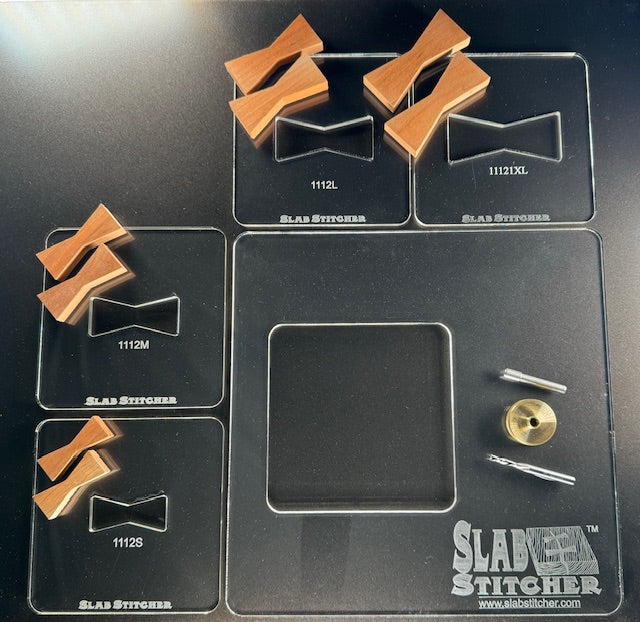
STEP 1: GETTING THE RIGHT STUFF
It's always the worst when a customer gets their first order from us and discovers that they overlooked a critical component needed to start stitching, so here is our recommended list of tools and Slab Stitcher gear required to start.
- Router: any router with a 1/4" Collet will work, but you'll need to double-check that the router can readily hold a guide bushing. Many newer entry-level router models seem to lack this function, so check your specs to see if it can hold a guide bushing. If not, we've designed over 14 custom-made sub-bases to fit the exact specifications of many standard US router base plate models. Or we sell a few generic DIY models if you have an uncommon router. Find your sub-base HERE to order.
- Chisel: many of our router inlay designs require minimal chisel work to complete the process (although many procedures are chisel-free). A Bevel Edged Chisel works best but we're not picky here; use what you have. Even a utility knife could work. Just make sure it's sharp.
- Mallet/Hammer: whatever you have on hand will work. We often recommend using a wooden block in between your Mallet and the Inlay to displace the swings and give your inlay a nice clean install. It dramatically lessens the change for an errant hit or a corner that breaks the inlay.
- Slab Stitcher Starter Kit: Found HERE, you'll need one of our Starter Kits for the best chance of success. All Starter Kits include our Main Frame (which is required for all our two-step template designs and greatly assists with aligning and securing the work on all our designs), our router bit, and our router guide bushing (manufactured to our specifications). All of our inlays and templates are designed to work exactly with this specific bit and guide bushing and give the best results.
- Slab Stitcher Template and Inlay: These are included in most of our Starter Kits (the exception to this is our Build Your Own Kit, which requires at least one Expansion Pack). Additional designs can be added to your Slab Stitcher collection by purchasing an Expansion Pack. Our system is designed to work with our Inlays, which can be found HERE when you're ready to restock.
STEP 2: SET UP THE ROUTER BIT HEIGHT
Once your sub-base is on and your guide bushing is centered, you can use the inlay template to help set the height for your router bit. The guide bushing is two pieces. Some new woodworkers are surprised to learn that the guide bushing unscrews from itself in order to be installed.
Setting up the router bit height means setting the correct cutting depth for your inlay. This is important for ensuring your inlay design lays flat and isn't too proud or shallow. This length should be the thickness of an inlay PLUS the thickness of the template.
To do so, set down two inlays side by side with a few inches of space in between and place one of your templates on top of them. Place your router on top of the template and drop the bit down, it is the ideal inlay depth for your bit when it hits your wood base. Tighten the Router base to the motor.
STEP 3: CLAMP THE MAINFRAME WITH THE TEMPLATE TO YOUR WORKPIECE
Place the Main Frame onto your project and clamp to secure it, keeping mindful that the clamp locations will not impede the router's path. Once the clamps are secure, gently place your template piece right into the Main Frame. Apply even pressure to both sides of the template, and it should fit right in so it doesn't move around. Paste wax can be added to the outer edge of the template to help its insertion in the Main Frame.
STEP 4: ROUT OUT INLAY RECESS
Routing your inlay recess is the fun part when you get to start making cuts, but it's also where people tend to make mistakes! For a well-executed inlay, drill a small starter hole using a 1/4" or 5/16" drill bit to a depth equal to or slightly deeper than your inlay. Place your Router in a standing position inside the starter hole. Keep your hands in a safe spot where you have as much control as possible. Maneuver as needed with small, controlled movements.
Start by going clockwise around the border of your template. Once you get the whole way through, you can begin making sweeping movements as you make your way across.
Sawdust can pack into the recess on some designs and with some router models, so plan to use dust collection or stop halfway through to blow the dust out of the recess. Inspect the outer edge of your recess to make sure your cut is consistent with the template. If not, take a second pass around the perimeter.
STEP 5: CHISEL CORNERS TO A POINT
While this is not needed for all inlays, many designs will require some light to mild chisel work to complete the recess. Make minor cuts with your chisel as required.
Tip: an aluminum inlay can be lightly tapped over the recess to mark the corners that need chiseling, even if you plan to use a wooden inlay in the final installation.
STEP 6: APPLY GLUE TO RECESS
Double-check that your chisel work is done and that the inlay lines up with the recess. Apply appropriate wood glue to the bottom and sides of your recess. Rarely does anyone use too little glue, but you certainly can use too much.
Note: metal inlays are best installed using a 5-minute epoxy or similar.
STEP 7: INSERT DESIRED INLAY AND TAP IN
Carefully place the inlay correctly into the recess, with the etched wood name or horizontal line facing INTO the recess, and cover completely with a wooden block or similar. Use a mallet/hammer to tap the inlay into place.
Tip: if you can read the wood name or see the horizontal like in the final piece, you installed it upside down. Our inlays have micro bevels and fit much better when inserted into the piece correctly.
STEP 8: SAND INLAY FLAT
If sanding is required, sand the top until everything is flush and smooth. Once you glue down the inlay and sand it down, it should lay perfectly flush against the base. Your perfect-fitting inlays are all set!
Tip: your inlay should be flawless and perfect, but if you do see a small gap, you can permanently hide your mistake with glue and sawdust to fill the void and give you the best possible final product.
FAQs
How does Slab Stitcher work?
The Slab Stitcher system simplifies and expedites the tedious process of installing hand-cut inlays. Our Starter Kit provides all of the necessary components to quickly and easily install the inlay of your choice using minimal tools.
Browse our full collection of starter kits here
How thick are the inlays?
Most of our inlays are 1/4" thick, and some designs also include 1/2" thick options. Only our decorative designs like our 4-Point and 5-Point Stars rely on 1/8 thick inlays.
Star--1/8" 5 Point Segmented Star Inlays
Star--1/8" 5 Point Segmented Star Expansion Packs
Star--1/8" 4 Point Segmented Star Inlays
Star--1/8" 4 Point Segmented Star Expansion Packs
But my slab is thicker than that, what should I do?
We've spent years perfecting this system and stress testing the heck out of it. We've found that even our 1/4" thick wooden inlays were sturdy enough to hold large cracks and correct major shifting in slabs. We've seen customers use a second (or even third) inlay stacked together to give more strength or piece-of-mind, with some even adding an aluminum inlay for the gnarliest of cracks. For those that prefer the look of full-thickness inlays in a slab project, then we simply recommend stacking inlays to give the desired look.
Browse our router inlay collections here